Sandbagged!

Sandbagged!
Photograph by Steve Barnett

Thursday, 9 September 2010

Now is the time for...

... grayling on the dry fly!

If you are out over the next few weeks and you find grayling rising, this fly is very reliable in bringing them up from amazing depths to snaffle this tiny creation.  Sturdy's Fancy may be a "fancy" pattern, implying to many that it doesn't imitate anything but please believe me this is another very successful caricature style of fly that can be used to hint at all sorts of flies: reed smuts; midges; tiny terrestrials; even little sedge flies.  Sturdy's Fancy can mimic them all.

It is best on small hooks - 16 down to 20 (for smaller than that the materials are not really suitable) with 16 and 18 being the most useful sizes.  These small hooks force you to use fine tippet material 6x or even 7x so don't bang hard on the strike and to give yourself a bit of stretch, make the tippet at least a yard long with an ell or even a fathom being better if the wind conditions permit.

Here's how to make the Sturdy's Fancy:
Put the hook in the vice shielding the point and wind on a short bed of purple thread, in this example it is Pearsall's purple Gossamer, same stuff as used in Kite's Imperial.
Lay on and tie in a piece of  red floss with two turns of the thread.  Danville's DRF Fire Orange (fluorescent red) nylon floss has been used here but the original was red silk floss.
Lay the forward pointing length of floss back over to the bend and trap it on top of the rearward pointing length on top of the hook.
Carry on winding a bed of thread whilst at the same time tying down the floss to the bend

Cut the tail to a length about the same as the hook gape

Tie in a single peacock herl and keep the thread dangling at the bend.


Wind the herl to the front of the bed of thread and back to the dangling thread to make a body.  Tie in the peacock herl at the bend and then rib the herl body with the thread in open spiral turns then keep winding forward four turns of thread on the hook shank to make a bed for the hackle stalk.


Tie in the hackle with the dull, concave side facing you, making a bed as you go for the hackle when you wind it.  Trim off the waste hackle stalk.
Wind the hackle.  Tie it in and wind the thread quickly through the hackle back to the eye to avoid trapping too many hackle fibres.  Make a whip finish and varnish the head, cleaning out the eye whilst the varnish is still wet.  The hackle tip left in your hackle pliers makes a good pull through for the job.

You will be amazed by this fly if you have not already used it.  Grayling will rise up from the bottom, through several feet of water to eat it.  If you see them "missing" the fly, try a finer tippet, but do be careful on the strike.

Regular Rod

Saturday, 4 September 2010

Rooting for you!

You might enjoy this little trick that I've used since being a lad hunting chub in overgrown places...

Take a look at this fish filled spot.  There is nearly always a row of fish rising here throughout the trout season.  The place looks rather uninviting at first glance and with a strict and total wading ban, it is almost impossible to cast here...

...except during periods of drought or near drought.

Low water?  Well yes indeed.  Of course all trees need roots to live.  Bigger trees by the waters edge, like this double trunked alder, have bigger roots and some of them stretch out under and - during dry spells - above the water!

See below...


Plenty of room for a full grown woman or man to sit cross legged.  It will keep your feet dry and provides a great fishing spot if you are happy to side cast up into the run where the fish are.


These spots are rarely fished efficiently, as most anglers will either struggle to dibble a fly to the fish from overhead or try from the opposite bank.  Sitting there at close quarters makes the whole process very easy and very effective too.

Just make sure you check that the root mass can take your weight without lowering you into the water, backside first, as you sit there in pride of place casting up to fish that are quite unlikely to have ever been caught before.

Special tip...  do your best to be stealthy when getting into position.  If, however, in despite of your valiant efforts to be stealthy, you do scare the fish, simply make yourself comfortable and sit there quietly and wait for the fish to rise again.  Then when they seem to be rising confidently (four times a minute is a pretty good indicator that they are no longer worried about your presence) make your first cast to the fish nearest to you...

Regular Rod

Thursday, 2 September 2010

Nondescript Sedge...

... or "NDS" to its friends!

Use a strong tippet in the larger sizes.  Be ready for sudden, violent rises when there is not much going on. 


Use it when you expect to get a bit of drag.  Twitch it on slow or still pools.  It continues working even after the trout have trimmed its wing into a little stump of deer hair, so don't throw them away. 

Last night I was told that you should tie six of these rather than five as folk will want more than one from you! 

The hook sizes can vary from size 8 down to 14 depending on the sedge flies that are about.  In the colour scheme here it seems to represent the Great Red Sedge quite well but it is not an exact match for anything.  It hints at everything instead.  Use pale materials and it makes a good moth for those all nighters in high summer when the scent of sweet rocket fills your nostrils and the air feels heavy with the prospects of good Sport...


Put the hook in the vice masking the point and starting at the bend wind forward a bed of orange thread.  I've used a size 12 hook here and Pearsalls Orange silk - yes the original orange for the Orange Partridge!  Look just use the orange thread you like.
Dub on a fairly generous pinch of cinnamon seal's fur - it's a mucky yellowy olive colour
Wind the body, the seal's fur should be used up just as you reach the end of the body
Rib the body with open spiralled turns of the thread and then continue for four turns to make a bed for the wing
Take a bunch of deer hair and gauge it against the body and bend so the tips are roughly aligned with the hook bend
Swap hands and hold the bunch of deer hair tight, clip off the waste prior to tying the bunch in
Tighten up the turns and make the wing flare a little as you tie it tight next to the body
Trim off the flared waste ends and dab a small spot of varnish on the remaining root ends of the deer hair.  (I use Sally Hanson Hard as Nails.)
Before the varnish has dried wind the thread forward to make a bed for the hackle stalk
Tie in the red hackle ("brown" in America) like this with the concave, dull side of the hackle facing you and, in tying in the hackle stalk, wind a bed of thread ready for the hackle turns.  Leave the thread dangling at the front of the body and wing.
Wind the hackle, six or seven turns on a fly this size, and quickly wind the thread through the hackle to avoid trapping too many fibres.  Then make a whip finish with a somewhat bolder head than you would do for an olive and then varnish the head and clear the eye whilst the varnish is still wet.  I use the hackle point out of the hackle pliers as a pull-through.

It is a quick and easy fly to tie.

Woe Betide the lot of you if I find all the fish I'm after won't eat it anymore because they've already experienced it when you cast and caught them on it before!
Regular Rod

Tuesday, 31 August 2010

Halt!

Who goes there?  Friend or Foe?


Well, to the trout, there is no doubt you are foe. So don't let the little fellows on sentry duty raise the alarm when you crawl into position to cast to the nice BIG fellow you have been watching from downstream.

The photograph below (click on it for a bigger picture) shows you the situation, but it is difficult to see the little trout on sentry duty in the glide to the left of the foreground.

Sentry above here ^
It is so very easy to fix your gaze on the big fish rising upstream that, as you make sure it doesn't see you, you can miss the presence of the little trout right under your nose. This leads to it dashing off in fear and if it heads upstream it will frighten the others in front of it and they in turn will charge upstream and frighten more and so on until your big fish is made aware that something is wrong and... Lo and Behold! The rises stop and it's as though there is not a fish in the river.  This is why you need to creep about, why you need polarised spectacles and why you need to be on the lookout for the little fish, even though you are trying for the big'uns.

Your strategy in a pool like this is to catch the sentry first. Return him gently, but downstream of you and aimed towards a weedbed.  So, instead of tearing off upriver, he makes for cover under the weeds. Then you can make that cast to the big fellow...

Of course they are not really on sentry duty. They just want the trout in front to not be there so they can move into the better place. Eventually, if all goes well for the sentry, it moves up through all the better places until, one day, he or she is the boss fish in the boss place - with sentries of his or her own to warn of danger.

Regular Rod


Saturday, 28 August 2010

Poly Prop Sherry...

...before it's too late again!

The first post was about using this fly.  The most recent was about still using it even though its time will shortly be drawing to a close for this season.  It dawned on me you might appreciate how to make the thing so you can have a go "before it's too late again".


Put the hook in the vice hiding the point and whip a little bump of orange thread at the bend
Tie in a good bunch of white cock hackle fibres in front of the bump and take the turns towards the bump, tying the fibres down tight to the bump, so the hackle fibres splay out.
Wind the thread up to the front of where the body will be, making a coarse bed of thread as you do so.


Take one strand (there are four to a card) of Tiemco Aero Dry Wing in Medium Dun and trap it on the top of the hook by two turns of the thread, leaving a long strand over the hook bend and a short strand over the eye.
Hold the long strand towards you at a right angle to the hook and take a diagonal turn over it and round the hook
Make figure of eight turns to anchor the wing both sides at right angles to the hook.  With the thread dangling in front of the wing dub on a small amount of Hot Orange seal's fur quite tightly.
Starting in front of the wing wind the dubbed thread of Hot Orange seal's fur down the hook finishing at the start of the tail.  It always looks rough and too fat at this stage.
Rib the body with the thread right back up to just behind the eye and make a whip finish and cut off the thread.
Get hold of the wings and carefully pull them back over the hook bend.  Gauge the length of the wings to about the distance from the wing roots to a point about mid-way through the hook bend and snip off the excess wing length with one cut of the scissors.
The fly should look like this at this stage (nearly finished).
Now take the fly out of the vice.  Hold it like this by the wings.  Snip off all the extraneous bits of seal's fur to make a thin body that has lots of cut ends of fur round its edges to catch the light.
Varnish the whip finish and clean out the eye whilst the varnish is still wet.  Et Voila!  The finished "Poly Prop Sherry" (or "PPS" to its friends).

Make five of these at a time.  One for the fish (we all make mistakes), one for the trees (we all make more mistakes), one on your tippet, one for your box and one for the angler who comes over and says "By Gum!  You're doing well tonight!  What fly are you using?"

Regular Rod

Wednesday, 25 August 2010

Last...

...Light

Click the image to enlarge it
As the summer draws to a close, to have Sport with the Sherry Spinner eaters, it is even more necessary to fish into the dark.  The daylight hours are now much shorter than they were when the Sherry Spinners appeared as the big attraction to trout and angler alike.  We have no choice if we still want to make the most of the chances to enjoy this, the very cream of dry fly fishing. 

Some water, which a few weeks ago you may have been able to fish until 9 and 10 o'clock at night, has to be ignored even though you know the fish are feeding there.  This is because you simply cannot see enough to be able to fish properly. 

Your strategy now has to be to find places where you will be facing west whilst you fish.  Make a note of where such places are and as the light fades, make sure you are sat or kneeling by one of them.  The effect is delightful.  A silvery, golden, pink sky makes the water's surface the same colour. Importantly, as well as delighting in this exquisite theatre of pleasures, you can see what is happening on the surface.  Your Sport can continue.  The only difference from earlier in the summer is that you pretty much fish just the one station for that evening.

Regular Rod

Sunday, 22 August 2010

Leader linguistics, tippet talk and tips...

...or Casts? What’s the point?

The English language is a clever thing. It absorbs words and expressions from any source if they are useful. English in the world of dry fly fishing is no exception. The old names we English used to use for naming the connection between the fly line and the fly were “Cast” and “Point”. Today, almost without exception, the American names are used. We now refer to the “Cast” as the “Leader” (the bit attached to the fly line) and the “Point” as the “Tippet” (the bit on the end that attaches to the fly). This is a most satisfactory arrangement with no ambiguity and a greatly reduced potential for confusion.

It will certainly help when explaining some of the ways you can fiddle about with the connection between your fly line and the fly...

Perennial questions about leaders on the fora and at winter club night talks include:

How long should my leader be? How long should my tippet be?
What’s the best way to tie it onto my fly line?
Shop bought tapered leader or build it myself? What knot? What material?
Best way to attach with a braided loop?
Furled leaders are best, right?

Before any of these questions are answered, let’s get the ground rules clear. All these answers below relate entirely to dry fly fishing in moving water courses. Not still waters and not anything but dry fly fishing!

Q. How long should my leader be? How long should my tippet be?
It depends!

There is no correct length to suit all conditions. However, a well constructed leader is remarkably easy to manage in lengths that many folk would say were “long”. A short leader is anything less than the length of the rod you are using. On some windy days you may be forced to use such a leader to have any chance of banging it out into the teeth of the gale. In normal conditions a leader that keeps the fly well away from the fly line is best. This usually means a leader between 12 and 20 feet long, including the tippet. This is only a guide. You may be fishing in conditions that force you to use a much shorter leader. On some windy days, when logic usually dictates a shorter leader, you may be better off with a much, much longer leader that simply fails to turn over in the headwinds! Certain fish that, on normal days, are impregnable can be tricked into making that mistake you are hoping for.

Click on the drawing to enlarge it
Can you work out what is happening here? What would happen with a cast to the fish using a “normal” leader that turned over perfectly?

Q. What’s the best way to tie it onto my fly line?

This causes all sorts of friendly argument on the fora. Remember these answers are specifically for DRY FLY fishing. We are not concerned with quickly taking off the leader to change from dry to wet with a team of droppers. We also need to be able to go from short to very long and still be able to manage the whole contraption with aplomb!

The ideal method has to be strong, slip through the guides easily without jamming (a 20 foot leader will force this upon you) and it must not cause a “hinge” effect through being less stiff than the fly line and the leader. A hinge renders delicate presentation almost unachievable!

This is why I use the needle knot to attach the (sacrificial) butt, which I make out of a yard or so of 22lbs nylon monofilament. This is thick enough to make a very shallow step down in taper from the end of the fly line and stiff enough to ensure no hinge effect when the leader turns over.

Q. Shop bought tapered leader or build it myself? What knot? What material?
You will be dry fly fishing in a variety of conditions. You will be changing the tippet from thick to thin to very thin to suit the size of fly you need for the circumstances at the time. The widest range of choices is what will meet your requirements best. So my recommendation is to build leaders yourself, using the best knots and the best materials.


For example:
Tie on the 22lbs BS nylon monofilament butt using the needle knot as above.  It should look like this when tightened.


Use the four turn water knot to tie on one or two yards of 15lbs BS nylon monofilament.
Tie on a tippet of a yard or two of 3x co-polymer monofilament.
That’s made a leader of from three to five yards suitable for attaching big flies.
For smaller flies, halve the 3x and tie on a two yard tippet of co-polymer of 5x, 6x or 7x.

You now have a basis on which to experiment. You are also able to simply rebuild the leader if you have a tangling incident that is beyond reasonable hope of restoration!

Q. Best way to attach with a braided loop?
Don’t! They hinge the link between fly line and leader. They come off at very inopportune moments. They slurp the water about when you pick the line off the water to recast. They throw a lot of spray on the surface when you false cast with them.

Q. Furled leaders are best, right?
Well they are lovely looking things and they turn over beautifully but they make the same disturbances that braided loops make. It is possible to make them land gently but it is harder to do so than with leaders built of monofilament lengths.

The simple method above has proved to be best. It gives you all the flexibility you will ever need. You become self sufficient. All you need are a few spools of monofilament and knowledge of the knots.

What say you?

Regular Rod

POSTSCRIPT - KNOT AGAIN!!!

There is a stronger knot for joining two lengths of line together than the four-turn water knot.  It is the figure of eight knot and I am indebted to Steve Kale for his persistent defence of this knot made me re-examine it and test it against the four-turn water knot.  He was right.  It is stronger and I will be using it from now on.  This blogpost and video shows you how to tie the figure-of-eight knot to join two pieces of line together.  If you prefer the four-turn water knot that is fine but there is a stronger knot and that is the "figure-of-eight" knot.

Friday, 20 August 2010

"Dry" Fly?

A wet evening last night made for a few difficulties...

The spinner returns have been consistent and predictable in this catchment. The thought of a few hours in the gloaming amongst the flies and the fish makes life at work bearable in the few moments of day dreaming that naturally creep into a day nailed to the desk. Coming out in the rain last night it was not obvious whether there would be any fly activity at all.

There were singleton sedge flies about, mainly under overhanging vegetation, but the scarce rises (when they were visible) were almost certainly not to sedge flies. There were so few rises it was pot luck to have the eye on the right bit of water at the right moment to make any judgement as to the type of fly being eaten. The constant rain pattering away at the surface made it impossible to see the flies on the water. BUT...

Some fish were rising. There had to be a chance of a little Sport before bedtime.
It was time to cash in a little local knowledge - gained, of course from RECONNAISSANCE on previous occasions spent wandering and sitting by the water – the decision was taken to head for a spot where the fish “usually” rise whenever there are flies to be eaten.

At last a fish was found that was rising frequently enough to come to a conclusion about the chosen menu. It was spinner. Okay, so there were no spinners dancing over the water, or if there were, the rain was hiding them from view, but this fish was making the elongated rise form caused by its close-to-the-surface position and its tilting up an inch or so to break the surface, first with the top of the head as it sucked in the fly, then the dorsal fin and finally the top of the tail as it levelled off in the water again, on station, ready for the next spinner to drift over its head.

The first cast fell short and lo and behold my fly sank! It was waterlogged! Out with it and sure enough it was wet through. A minute or so of attention and powdering had it dry and the cast landed right and the fish took it. A nice male brown trout of a pound or so that swam away well, after being less than 5 seconds out of the water thanks to the hook falling out as the net lifted him and the tension on the line was released. That was the encouragement needed to persevere against the Derbyshire Drizzle, famous for soaking you through without you noticing it happening!

Creeping up to another likely spot, the first cast here resulted in the fly sinking again, immediately! What was going on? I’d meticulously dried it after that first fish. Nevertheless, it was soaking wet and sank on this first cast. The fish had stopped rising. Daylight was fast disappearing. It was a good idea to move upstream to another spot. So I hooked the fly into one of the guides, tightened up and moved on. Having found another rising fish I sat down cross-legged on the bank and unshipped the fly from the guide. This time I looked at my fly a little more closely...


Well bless my soul! The fly, that a moment or so earlier had been perfectly dried and fluffed up ready to use, was now a wet and sorry looking thing. The guides were conducting water off the rod into big drips and my fly sitting in the middle of these drips was getting soaked through every time I moved on. There was the answer. Dry and treat the fly before the first cast, not simply before moving on.

In dry weather amadou makes a good medium for drying flies but in wet weather, wet hands will render the amadou useless in a matter of minutes. Dessicant powders are a better bet. I use Top Ride to shake the fly in and, this year, I’ve also been using Frog’s Fanny that is applied with a brush. I found they both worked equally well in the wet last night.

The conditions, the fish and the flies reinforced the lessons inculcated before that to have some success in our Sport it is first necessary to be there, in despite of the uncomfortable conditions; to find rising fish and if you cannot see the flies being taken, work out what is the likeliest bet by watching the rise forms; and that the first cast has the best chance if the fly is presented properly.

The new lesson last night was to check the fly closely and make sure it was going to float before making that first cast...


Regular Rod

Tuesday, 17 August 2010

Unashamed free advertisement!

Not really an advertisement, more a piece of inside information for readers of this blog.  You already know that to get the most out of your dry fly fishing it is best to fish where you have the most opportunity of casting to the best possible fish in delightful surroundings.
 
Haddon Estate's Derbyshire Wye at Grayling Time
Haddon Estate has just introduced what has to be the very best value for anglers wanting to make a bit more of a commitment to their Derbyshire Wye fishery than simply buying a day ticket.  The new Peacock Fly Fishing Club arrangements are just plain fantastic and make it viable to fish whenever you want.  Members will be able to pop over after work and fish the evening rise, or make a dawn raid in mid-summer before the day gets going.  The grayling fishing is included in the membership fee. The possibilities are endless!

Have a look here and see why I'm bubbling over with excitement...

Regular Rod

Saturday, 14 August 2010

Double Badger

This is a brilliant fly and very versatile...

It can imitate just about any fly.  It even works, dressed on a size 6 or 8 hook, as a Mayfly!


On the river Trent, downstream of Beeston Weir, it once caught me 80 chub in a few hours on a very hot day back in the 1970's. 

In size 14 it will work during an olive hatch although to our eyes it looks nowt like the real thing.  For sedge flies it is an excellent representation and for many terrestrials it makes a fake that the trout and grayling often decide is acceptable.  On a "dry fly only" water it is a mainstay in fast violent water, no need to go below the meniscus with a KlinkhÃ¥mer Special or derivative, the Double Badger will let you see what is going on and will bring the fish up for you.

When the trout have worn out the peacock herl with their teeth and the fly may look a little the worse for wear, don't throw it away.  Put it in your hat band for this special occasion... 

During any of the 1 to 2 hour blizzards of Caenis making their presence felt, a lot is going on at once.  The nymphs are emerging, the duns are hatching, swirls of Caenis spinners are mating in the air over the water and nearby, as fast as they can and...  the spinners are coming back to the water.  It is a swirling chaos of activity.  The fish are rising and many anglers are beaten into believing that Caenis do not present a reasonable opportunity for success.  Even if you could tie a perfect fake on a size 26 hook, why would the trout eat your single offering when there are so many real ones?  Yours would be hopelessly lost.  Persevere by all means with this approach but you will be hoping for a dumb fluke of a chance.  But there is a way that gives you a real chance.  In fact it gives you many, very good chances.

Watching the fish rise during a Caenis blizzard, you will see some of the very best fish making a very distinctive rise form.  These fish hang at an angle in the water and with gaping mouths simply slide up and down through the surface of the water, maintaining their angled pose without levelling off between rises.  Close observation shows that they are engulfing rafts of Caenis (mainly dead and dying spinners) that are all tangled up together. 


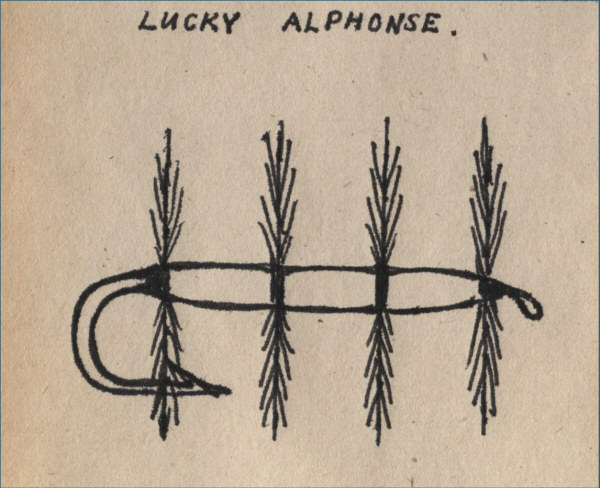
Years ago the late Richard Walker invented a fly for such occasions that he called "Lucky Alphonse".  Basically it consisted of up to half a dozen little white hackled dry flies tied on a size 12 long shank hook. 

It's a fly that does work but my it is awkward to tie and takes a while for each one.  Instead I use one of my worn out Double Badgers that live in my hat band for just such opportunities.  It works beautifully so don't chuck 'em away.  Save them for a busy evening.  Turn a struggle for a bit of good luck into a clear, workable strategy that will bring you success.


Here's how to make the Double Badger:

Put the hook in the vice masking the point, and make a bed of brown thread starting behind the eye finishing at the bend


Prepare a badger hackle and tie it in at the bend


Here's the hackle almost tied in, two more turns to go

Wind the hackle back to the thread and then wind the thread through the hackle tying it in securely

Now tie in a strand of peacock herl immediately in front of this aft hackle

Leave the thread dangling where you tied in the peacock herl and wind a body by close turns of the herl up to the front and then back again to the thread and tie in the herl
Rib the herl with open turns of the thread up to the front of the body and make a tiny bed for the front hackle

Tie in the front hackle taking the thread back to the front of the body and making a bed for the hackle turns as you go


Wind the hackle and tie it in taking the thread through the hackle to make a whip finish just against the eye, varnish the whip finish with clear nail polish, clean out the eye of the hook whilst the varnish is still wet (the left-over, hackle point, from your hackle pliers, makes a good pull-through) and there you have it - The Double Badger!

You can read about the inventing of the Double Badger in Angling with the Fly by J N Watson.


Regular Rod